MSI MAG B550 TOMAHAWK Review: A Solid Quality/Price Gaming Motherboard
Today, we are going to take a look at the MSI MAG B550 TOMAHAWK motherboard: a motherboard based on the latest AMD B550 chipset which has the advantage of being more affordable than the AMD X570 chipset while offering PCIe 4.0 support. As a reminder, the TOMAHAWK range is MSI's best-seller, and for good reason, we generally have a good quality/price ratio.
Here is a short summary of our MSI MAG B550 TOMAHAWK review:
MSI MAG B550 TOMAHAWK: Introduction, technical specifications and test setup
The MSI MAG B550 TOMAHAWK is an ATX board capable of running the third generation AMD Ryzen processors such as the 3900X, 3700X, etc. and it is ready for the future generation Ryzen 4000.

We can accommodate up to 4 memory sticks with a total of 128 GB at an impressive 5100 MHz. With an 8-pin power plug and 10+2 phases of 60A ISL99360 SPS power plugs totaling 600A for the Vcore via the Renesas RAA22904 controller. Note that there are no phase doublers on this motherboard, the phases are doubled analogically. The rear connector has two USB 3.2 Gen2 Type-C ports offering a theoretical throughput of 10 Gbps.
One point that users are very keen on, is the support of the PCie 4.0 standard. In our case the MSI MAG B550 has only the first PCIe x16 that supports PCIe 4.0, while the other slots are PCIe 3.0. A strong feature for this motherboard is that both SSD M.2 slots have heat sinks to avoid thermal throttling. As a reminder, thermal throttling temporarily reduces the performance of the SSD while its temperature drops or stabilizes.
In terms of network connectivity, we have 2 Ethernet ports. One port is based on a Realtek® RTL8111H controller and offers 1 Gigabit, while the second will offer 2.5 Gigabit under a Realtek® RTL8125B controller. No WiFi or Bluetooth here. The RGB lighting is of course part of the game, but is very discreet since we only find it with a small aura effect around the heat sink of the chipset.
Here is a table comparing the AMD X570, B550 and of course B450 chipsets.
As for prices, we can find it for $179.99 on Amazon, or at the same price on NewEgg. However, this still represents some price increase compared to cards based on the AMD B450 chipset, as the TOMAHAWK MAX B450 is available from $99. To compare with intel chipsets, the Z490 TOMAHAWK starts at $189.99 and the B460 at $139.99.
Enough with the presentation, let’s move on to the good stuff, but before we do that let’s have a look at our test configuration :
We will be testing the MSI MAG B550 TOMAHAWK using the following configuration:
AMD Ryzen 9 3900X processor
Power supply be quiet! Dark Power Pro 11 1000 W
SSD Samsung EVO 970 1 TB
RAM DDR4 CORSAIR Vengeance RGB PRO 2 x 8 GB @3200 MHz
Watercooling Corsair H100i RGB PLATINUM AIO
MSI MAG B550 TOMAHAWK: Design
Visually, the design of this motherboard is based on a design with black and white tones both on the heat sinks and on the PCB itself: a simple no-frills design that can find it’s place in any gaming PC build. The back of the board does not include a backplate, as you could have guessed that from the positioning of this reference.
VRM heat sinks around the socket are simple but visually effective. They are not connected by a heat pipe. The top one has the MAG logo on the left and the heatsink that also acts as a cover for the rear connector has the MSI logo on the bottom. The black and white patterns of the TOMAHAWK range are found in these locations.
Above the 24-pin power connector we have an EZ Debug LED display via 4 LEDs which will light up according to the following diagram: Boot, VGA, DRAM and CPU. Under the power connector we find the header for USB 3.2 Type-C port.
The heat sink of the chipset contains TOMAHAWK and it is also the only RGB area on the motherboard. Here no LED strip directly, but just a few LEDs on the periphery that will make an aura effect. The heat sink of the top SSD M.2 slot has the mention Lightning GEN 4 M.2.
MSI MAG B550 TOMAHAWK: Bios
Now that we had a good look at the motherboard let's go into the BIOS of this MSI MAG B550 TOMAHAWK and take a closer look at what options we have.
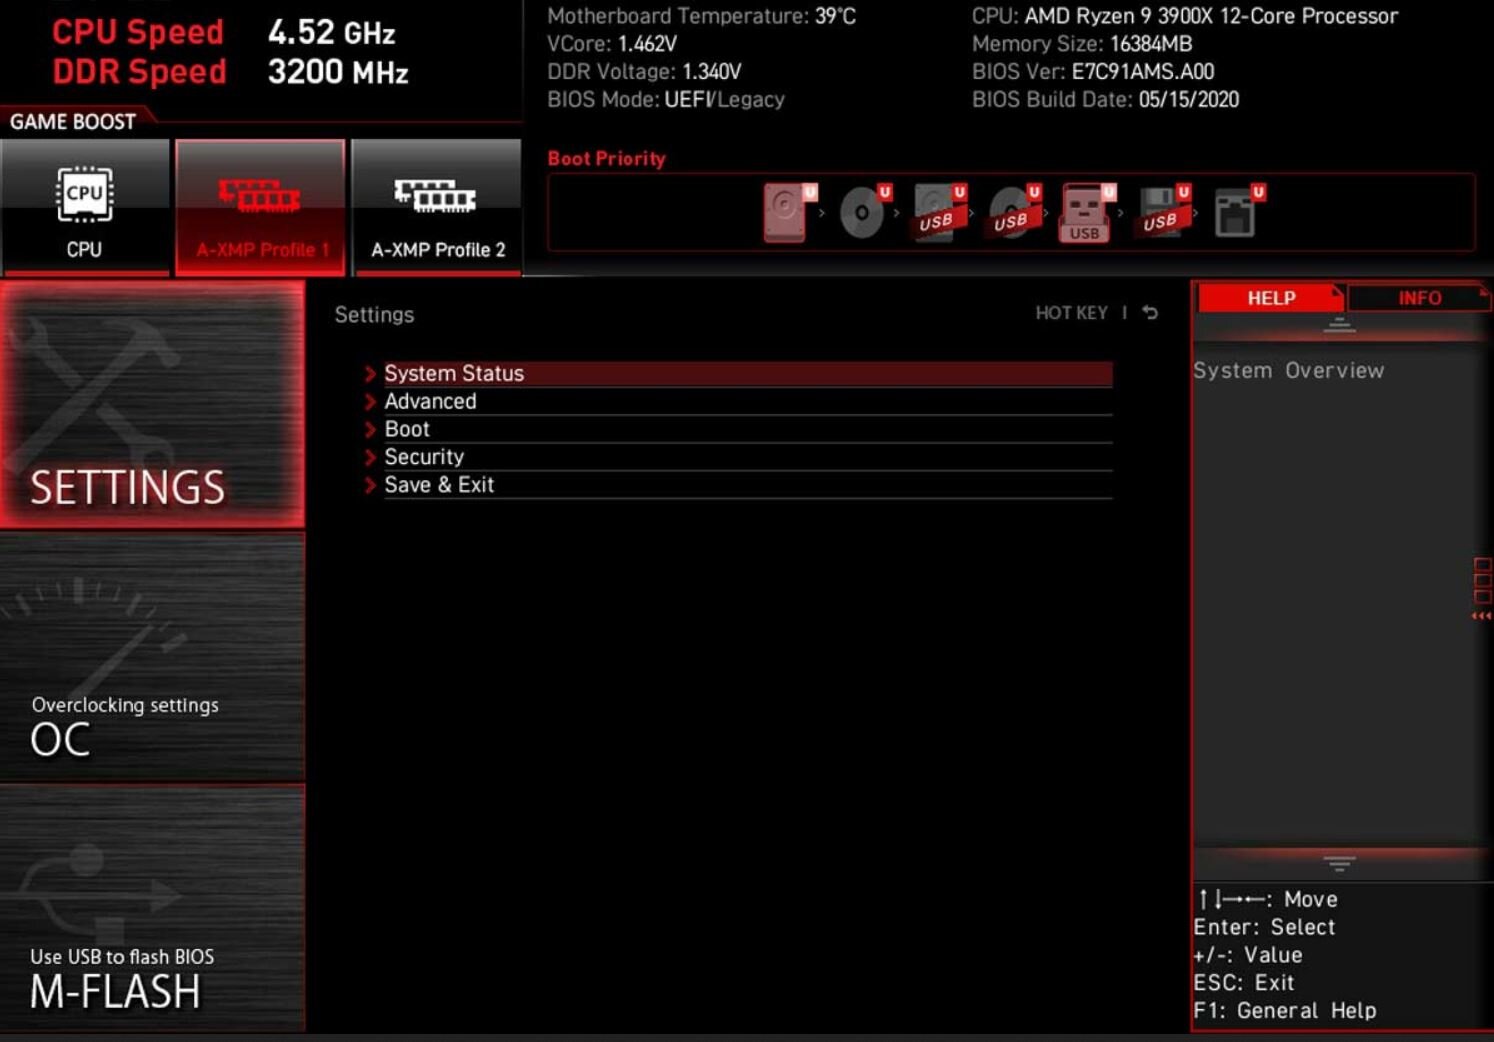
To begin we arrive in the EZ Mode which contains the essential information. This one will summarize the references of the processor, the motherboard and give us the current operating frequencies and temperatures. We can also simply activate the XMP profile (something we should always do) or activate the Game Boost automatic overclocking function or change the boot priority order.
The advanced menu (F7 key to switch between EZ Mode and advanced mode) consists of six tabs :
Settings
OC
M-Flash
OC Profile
Hardware Monitor
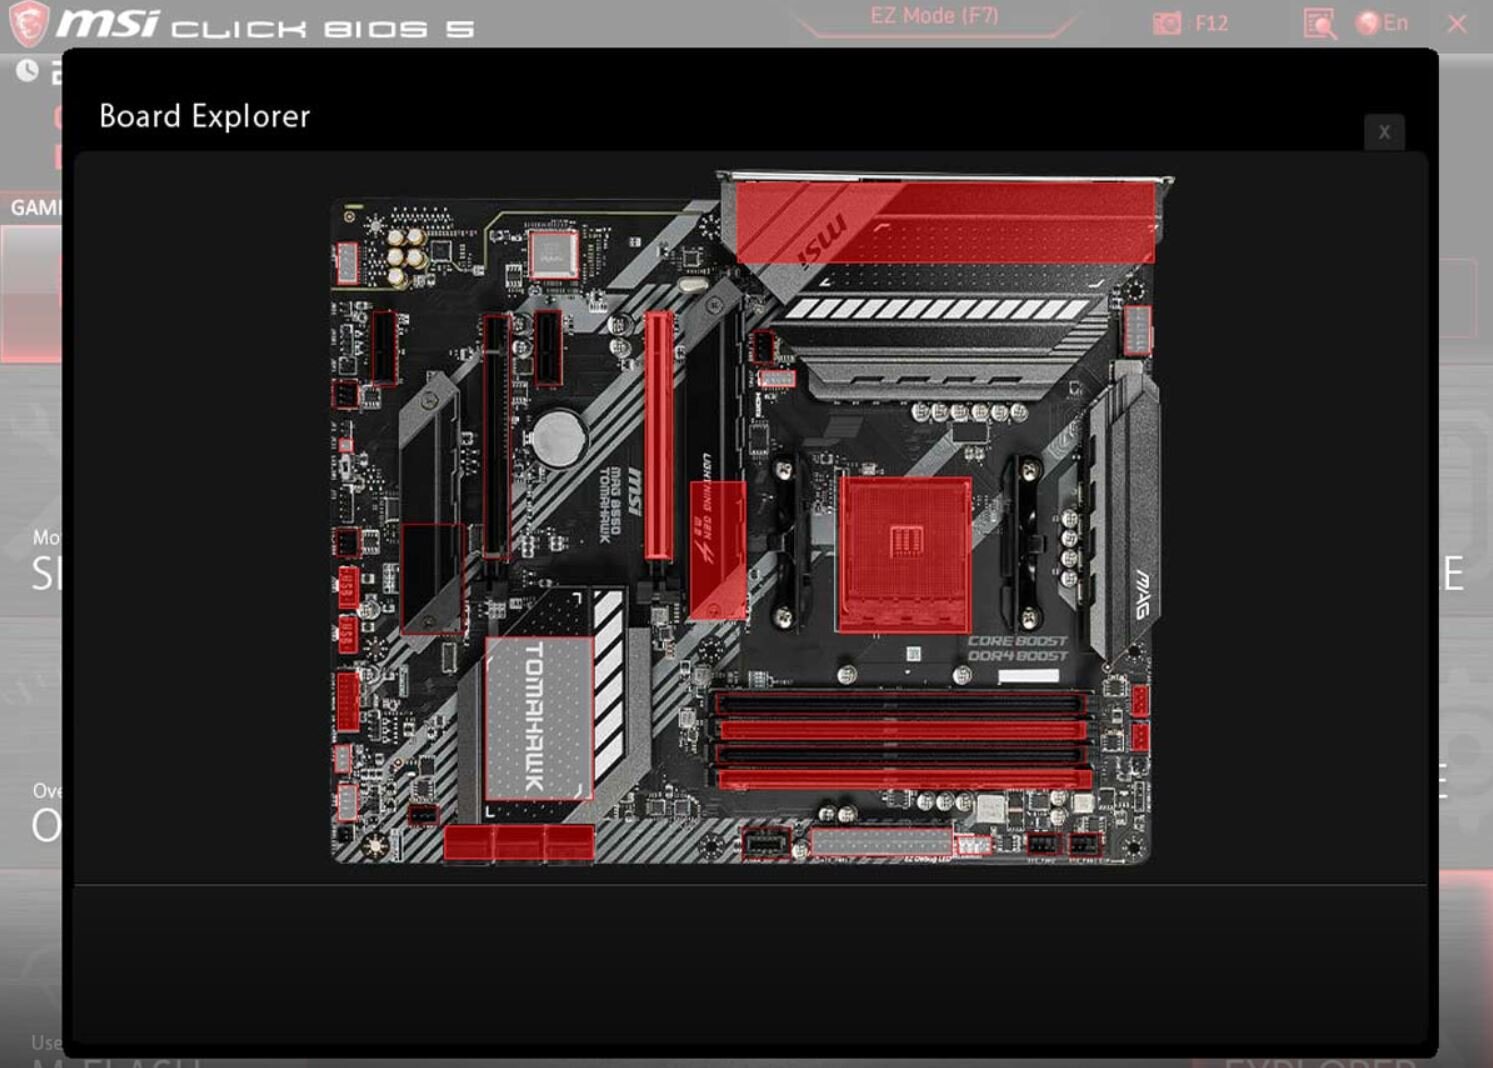
Board Explorer

In the "Settings" tab, we have more global settings such as the Secure Erase feature, power options, USB configurations, etc. It is also via this tab that we can touch the PBO (Precision Boost Overdrive) settings. Here we can also set an administrator password, save changes or restore default settings, etc. As you can see, this is where most of the essential settings will be found.
In the " OC " tab, all the parameters related to overclocking are present, both CPU and memory. Voltages,system multiplier, etc. are here for anyone who knows what they are doing.

In the "M-FLASH" menu we come to the utility that allows us to update the BIOS either via a local file on a USB stick or directly from MSI’s servers.
The " OC Profile " tab allows us to save our profiles on a USB key or directly internally up to six different profiles. This is also where we can load a profile.
The "Hardware Monitor" tab allows us to set up a fan profiles. For each fan header on the motherboard, we will be able to define a fixed speed or a speed that adapts to a curve according to the temperature. We can also see the voltages of various components.

Finally, the "Board Explorer" tab offers us an interactive view of the motherboard. By hovering over the slots with the mouse we can see the components detected by the system: a feature that can be useful in some cases.
This is all we can find in the bios. Plenty of options to customize your settings the way you want. Now in the next sections of our review let's have a look at the overclocking capabilities of the MAG B550 and VRM temperatures.
Automatic overclocking: MSI MAG B550 TOMAHAWK Game Boost
It is via the BIOS that we activate the automatic overclocking of our motherboard. The Game Boost function, contrary to what was done on previous generations, will simply activate a predefined OC profile: we can no longer choose several OC levels. Note that we can also use the MSI Dragon Center software to activate this overclocking.
Before we start, note that the MSI card has overclocked the CPU at 4.15 GHz after Game Boos has been activated. Let's start by looking at the voltages reached with and without OC.
Under Fire Strike the CPU voltage is 1.367 V and increases to 1.376 V with OC. Under Cinebench R15 it is 1.322 V at stock and increases to 1.371 V with Game Boost. Note that these measurements are taken with the multimeter directly at the back of the socket while the processor is under load.
As for the temperatures, it was therefore to be expected when you see the voltages: we are warmer. Under Cinebench R15 we go from 65.9°C to 69.1°C and under Fire Strike the processor goes from 70.4°C to 69.4°C (a degree of deviation that may present an acceptable margin of error since the voltage increased only slightly with the OC).
Finally, let's take a look at the scores obtained under Cinebench R15 and Fire Strike. As you will soon see, none of the three cards tested here really stand out. Under Cinebench R15 we get a score of 3188 points which puts us at the top of the ranking while the third place is only 3183 points. This means that at this level it is about equivalence given the totally negligible differences. Under Fire Strike we achieve a Physics Score of 29 723 points. Here again the variations go from 29 723 points for our MSI card to 29 961 points for the AORUS card.
Let's make it clear, the automatic OC has very little impact on performance, whatever the motherboard used, whether it is on a model that favors the quality/price ratio like this TOMAHAWK or the flagships. In any case, it is always better to use a manual OC to finely control the voltage in order to have the lowest power consumption, but especially to avoid unnecessary overheating.
MSI MAG B550 TOMAHAWK: VRM temperatures
Often overlooked by users due to a lack of clear information on this subject, power delivery of a motherboard is nevertheless a crucial element. If it is so important, the reason is simple: it is a set of components that will take care of supplying the processor with power.
The power must therefore be clean and supplied in a precise manner. As you know by now, the temperatures of a power delivery stage must be kept under control so as not to risk damaging its hardware or shortening its lifespan. Moreover, good temperatures also prevent processor throttling, something that is particularly constraining.
As a reminder, "thermal throttling" consists of a simple thing: for example, if we have too high temperatures on the VRMs, the processor will then clamp its frequency in order to consume less energy the time it takes for the temperature of the VRMs to drop. Then the temperatures will go back up to the point where thermal throttling appears again and so on. An effect we had already seen on an X570 chipset motherboard in our test dedicated to VRM temperatures on entry-level boards. This effect is of course possible with VRM, but also exists on M.2 format SSDs (mainly on M.2 NVMe SSDs).
We will therefore analyze the configuration of the power delivery stage and test the temperatures using a precise protocol. But in order to do this in a fair way and to compare motherboards with each other, we have to make some adjustments.
Not all motherboards are the same in terms of the voltage applied to the processor even if we manually enter the Vcore in the BIOS. Indeed, on each motherboard we can have more or less important differences on the CPU voltage even if we manually set the CPU voltage.
For this reason we will apply a specific voltage and try to get as close as possible to it by playing with the the CPU voltage in the BIOS. We start by unifying the motherboards, for this we manually enter several parameters in the BIOS such as the ratio and voltages. So we look for a precise voltage to reach and to be sure to have the closest possible voltage between each motherboard, we measure it at the back of the socket via a multimeter.
In concrete terms, we have set the ratio, i.e. the frequency of the CPU at 43, or 4.3 GHz on all the cores. We have set a Vcore of 1.40 V and in charge the measured Vcore is 1.413 V at the multimeter (target at 1.397V for this test protocol on the AMD B550 chipset). The PBO (Precision Boost Overdrive) technology is disabled.
Then, to measure the temperatures of the VRMs, we take the temperatures using three different methods in order to cross-check the data and be as consistent as possible. Here is the detail:
We take the VRM temperature via HWiNFO.
We use our thermal camera to see the hottest point from the front.
We also record the temperatures at the back of the motherboard and at the VRM level.
Note that for the rear, the number of PCB layers on the motherboard is important. Indeed a PCB with 8 layers will be less hot at the back than a board with only 4 or 6 layers. Here too the presence of a backplate is important when it participates in the heat dissipation of the VRMs.
Finally we move on to the laser thermometer. This one will point the hottest point at the front and at the back of the motherboard.
To heat up the VRMs on this motherboard, we run a one-hour benchmark on Prime95: a stress test that will put the processor and therefore the VRMs (since they power the processor) to the test. Note however that under normal conditions of use, we very rarely reach such a level of VRM and CPU usage, at least not over such a long period of time.
Before moving on to the benchmarks, let's take a closer look at the power delivery stage of this MSI MAG B550 TOMAHAWK motherboard. With an 8-pin power connector we have 10+2 power supply phases. These are 60A ISL99360 SPS MOSFETs totaling 600A for the Vcore via the Renesas RAA22904 controller. Note that there are no phase doublers on this motherboard, the phases are doubled analogically. The board has six PCB layers. To cool everything, MSI simply uses two aluminum heat sinks.
Before starting by looking at the temperatures, let's take stock of the voltages obtained on the different motherboards. Among the three cards in this comparison, we have the B550 AORUS MASTER and the ASUS ROG STRIX B550-E Gaming which represents the flagship of the B550 chipset.

The MSI card is not a flagship, but it is simply the range that represents the brand's best-seller thanks to a good quality / price ratio. Unfortunately, we had to increase the CPU Vcore on the TOMAHAWK a notch since under the Prime95 stress test we systematically crashed after 45 minutes. An aspect to take into account when comparing temperatures. Thus, we have a multimeter voltage of 1.413 V for the MSI against 1.402 V for the ASUS ROG B550-E or even 1.397 V for the card from the B550 AORUS.
From the front, our thermal camera detects a maximum temperature of 57.2 ° C. At the back, at the PCB, we read 61.8 ° C with the thermal camera, and 60.4 ° C with the laser thermometer. These are perfectly good temperatures, and we had no thermal throttling effect. In addition, from the front the temperature measured is even lower than the temperatures of our B550 AORUS MASTER, and at the rear we are barely 1 ° C warmer.

As the photos of our thermal camera show, the heat sinks do their job very well since from the front since the heat is well distributed. As is often the case, the hottest point is on the left of the socket (front view).


If we switch to HWiNFO, it displays a maximum temperature of 62.5°C. In addition, the maximum temperature that we recorded on one of the capacitors with our laser thermometer is 46.8°C. Temperatures still very good compared to the the other two boards the ASUS ROG STRIX B550-E Gaming and the B550 AORUS Master.
Conclusion: MSI MAG B550 TOMAHAWK motherboard a solid quality/price gaming motherboard
To conclude this review of the MSI MAG B550 TOMAHAWK motherboard, we can say that we are satisfied with what we saw. In terms of network connectivity, we do not have WiFi, but a 2.5 Gigabit Ethernet port is present in addition to the classic 1 Gigabit which is already not bad on a card of this range. We have a header for a USB 3.2 Gen2 Type-C port for the front panel of a compatible box, but also two ports on the rear connectors.
For PCIe 4.0, we find a compatible PCIe x16 slot and an M.2 SSD slot on both. By the way, the two M.2 SSD slots have heat sinks and that's a very good thing. Also good news, these cards with the AMD B550 chipset do not require a fan to cool the chipset unlike the X570 cards.
Speaking of automatic overclocking, none of the AMD B550 chipset motherboards that have come into our hands have really stood out. In addition, the gains are very minimal in this case, coupled with our Ryzen 3900X.
On the other hand, the temperatures increase much more than the scores under Cinebench R15 and Fire Strike, it will therefore be worth going through a manual overclocking for a better control of the voltages and temperatures.
As for VRM temperatures, this MSI MAG B550 TOMAHAWK works well. The temperatures are more than correct and it has done just as well as the flagships boards from ASUS (the STRIX B550-E and the B550 AORUS MASTER). With an 8-pin socket power plug, we have 10 + 2 power phase and these are 60 A ISL99360 SPS MOSFETs. The controller is a Renesas RAA22904. No phase doublers, but they are simply doubled analogically. It also has six layers of PCB.
For us, the MSI MAG B550 TOMAHAWK represents good value for money, but we do regret the price increase compared to the B450 chipset, a problem common to all B550 motherboards.